|
|
|
1
|
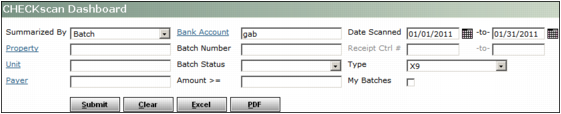
Open the CHECKscan Dashboard.
|
|
|
The menu path to the CHECKscan Dashboard depends on whether you are in Voyager Commercial; Voyager Condo, Co-op, and HOA or Voyager Residential:
Your system or database administrator may need to add these menu items to side menus. For more information, see “Adding Electronic Payment Processing Menu Items to Side Menus” in the Voyager Electronic Payment Processing User's Guide.
|
|
2
|
|
3
|

|
4
|
Click the link in the Batch Number field in the row corresponding to the batch that you want to review. The check scanning screen appears.
|

|
5
|
|
6
|
|
7
|
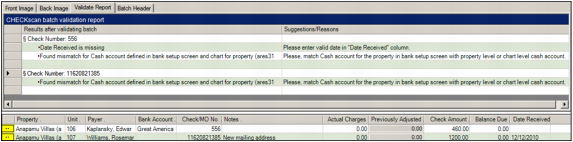
If you want to view information about invalid checks in the batch, click the Validate Report tab. The CHECKscan Batch Validation report appears.
|
|
8
|
If you want to delete a check, select the Del check box in the row corresponding to that check.
|
|
a
|
Click Delete All Checks. A confirmation request appears.
|
|
b
|
Click Yes.
|
|
a
|
Click the amount in the Check Amount field corresponding that that check.
|
|
c
|
Click Save.
|
|
|
|
a
|
In the Date Received field, type the date on which the checks were received, and press the TAB key. A confirmation request appears.
|
|
b
|
Click Yes.
|
|
a
|
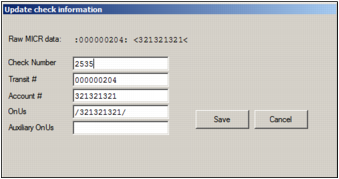
Click the MICR button
|
|
|
You should only edit the fields on the Update Check Information screen if data was improperly entered. If you enter invalid information, your bank will reject the check when it processes the batch file.
|
|
c
|
Click Save.
|
|
13
|
|
14
|
|
a
|
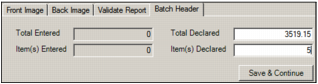
Click the Batch Header tab.
|
|
c
|
Click Save & Continue.
|
|
16
|
Click Save.
|
|
The information that appears in the table on the Payment tab. Options are:
Batch The batch number, batch amount, date scanned, status, and status date of check batches. If you want to post or delete batches from the CHECKscan Dashboard, you must select this option.
Details The check number, property, bank account, check amount, date scanned, batch number, comments, status, control number, receipt batch number, and status date of checks.
Property The property code, total amount, and number of checks for a property.
Not Associated The check number, property, bank account, check amount, date scanned, batch number, comments, status, control number, receipt batch number, and status date of checks that are not associated with a payer (the status of these checks is always Attention Required).
|
|
|
The status of check batches that appear in the table on the Payment tab. Options are:
Scanning in Progress Batches that are currently being edited by other users.
Attention Required Batches that are open and editable.
Ready to Post Batches that are closed and not editable.
Posted Batch that are posted and not editable.
|
|
|
Select X9.
NOTE For information about using CHECKscan on a database with an EFT provider set up for the ACH file format, contact Yardi technical support.
|
|